Just Another Dumpsite…
Homemade Noms
Quick & Easy Banana Bread
Baking is always a challenge for me. Unlike hot food where you can just adjust everything according to taste as you go along, baking is far from it. It’s concise science.

But that did not stop me from experimenting in the kitchen. From following hundreds of #Fitness and #healthy Instagram accounts which shares great recipes and ingredients basically for anything that I can think of, I managed to create MY ideal banana bread. Of course, this is after the countless trial and errors baking, several revisions and a couple of versions.
So without further ado, below is IamJoycee’s Quick ‘n Easy Banana Loaf Bread:
Ingredients
- 3 ripe bananas (close to over-ripe, with brown dots), mashed
- 2 eggs
- 1/4 cup low-fat milk
- 1 tsp vanilla extract
- 1/2 cup greek yoghurt
- 1/2 cup brown sugar
- 1 tsp lemon juice
- 2 cups rolled oats, blended fine for that ‘flour’ consistency
- 1 tsp baking soda
- Optional: 1/2 cup chopped walnuts, 1/4 cup semi-sweet chocolate chips
Process
Step 1. Pre-heat oven to 165 degrees C. Based on my readings, it’s best to have the oven pre-heated for at least 20 minutes
Step 2. Mix egg, banana, milk, vanilla, greek yoghurt, lemon juice & brown sugar.
Some observations here: During one of my experiments, I have used a ‘just ripe’ banana with 1.5 cups of brown sugar. This has almost the same sweetness as this current recipe which as an almost over-ripe banana and with only 1/2 cup of brown sugar.
Step 3. Fold in the oat flour and baking soda into the mix. Do not over mix.
Note: I don’t really understand the reason why over mixing is a no-no. Anyone care to enlighten me?
Step 4. Pour the batter in your mould. For me, I am using these paper moulds, individual sizes.
Step 5. Place in oven and let it cook for 35 – 40 minutes since I am using these small mini cups. If you are using loaf pans, let it cook for 60 – 80 minutes.
Step 6. Take it out of the oven and let cool on rack.
Bon appetit!
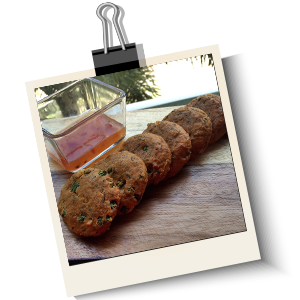
Sawasdee Ka: Easy Fish Cakes and Zucchini Salad
Chinese new year has come and gone. Now, we are left with added pounds in the gut and leftover food. We just had a huge hot pot at home and, yes, there were loads left from the spread.
So what I did, two days after the lunar new year, was make a fish cake (Tod Mun Pla) from the left overs that we have. And since I’ve made another kitchen gadget purchase (a spiralizer!), I made a side salad as well.
Thai Fish Cake
Ingredients
1 can Tuna Flakes in Olive Oil
150 g Fish Balls, chopped (This is the leftover from the hotpot, if not using, double the amount of Tuna Flakes instead)
2 Tbsp Thai Red Curry
1 egg, beaten
4 Tbsp corn starch
Zest of 1 Lemon (or use Kaffir lime, I used lemon because I didn’t find any lime or Kaffir lime leaves in the shop)
20 pcs French Beans, cut in small pieces
1 Thumb ginger, grated
bunch of fresh coriander (cilantro)
Directions
Pre-heat oven to 190 degrees celcius.I just recently bought an air fryer and it works wonders on everything. Set your Air Fryer settings on 180 degrees celcius- Blend tuna flakes, fish balls, red curry, egg, corn starch, lemon zest, ginger. If not using blender, make sure everything is chopped finely and mix together.
- Pour mixture in a deep dish and fold in beans and chopped fresh coriander.
- Shape into balls (golf sized) and pat it flat with your three fingers.
- Place in air fyer and cook for 12-15 minutes. You can either make it 7-8 minutes on each side. If you’re using oven, set it at 190 and cook for 15 – 20 minutes. Using these two cooking options ensures a healthier option for your fish cakes.
- Serve with a Thai chili dip.
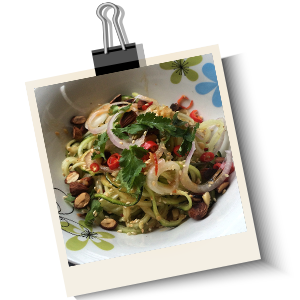
Thai Zucchini Salad
This is another experiment of mine using my newly bought (second hand) spiralizer. This tool is so cool and perfect for those who are doing paleo diet who looking for healthy alternatives to pasta such as zucchini noodles, etc. That or I’m following too much paleo / healthy instagram accounts.
Ingredients
3 large zucchinis, cut into long thin strips or use spiralizer 😉
1/2 of a large red onion
1 chili padi
1 tbsp toasted sesame seeds
1/4 cup chopped toasted almonds
1/2 cup chopped cilantro
Salt
Dressing
1 chili padi
2 garlic cloves, chopped finely
2 tbsp ginger, minced
1/4 cup green onion
2 tbsp rice wine vinegar
2 tbsp light soy sauce
2 tbsp peanut butter
1 tbsp sesame oil
1/4 cup coconut milk
Directions
- In a bowl, mix all ingredients for your dressing. What I do is put them all together in a glass bowl with lid, close the lid and shake all the ingredients like there’s no tomorrow! Set aside.
- Squeeze the water out of the zucchini by pressing a kitchen towel on top of it (while it sits on a colander)
- Place zucchini in a deep dish bowl and lightly mix together chopped onion, cilantro, chili and salt in the bowl.
- Sprinkle sesame seeds and toasted almonds on top.
- Drizzle your dressing on top. You can go full on with the dressing or just enough as desired.
- Serve fresh!
Hope you enjoy these quick and fresh lovely Thai treats. If you’re really not into spicy food, limit red curry paste (in fish cake) and chili (in zucchini salad). These recipes do not promise to take you to the Land of Smiles, but, hopefully, it reminds you of that sidewalk treat you had while there.
Do you have a similar recipe that you want to share?
Tablea Tsokolate Cupcake (Chocolate Cupcake)
I almost lost hope in baking. But it’s always good to persevere. Despite wasting money for having to throw away ‘baked goods’ which are close to inedible, I decided to give it another try and, voila, I was able to create a (close to) masterpiece – Tsokolate Cupcake.
Over the weekend, I decided to spend more time in the kitchen (apart from preparing @IamMrPies’ dog food) and decided I make good use of my tablea before it expires and sentenced to death by binning. It turned out time well spent as the project turned out successful – one of my few ones in baking. Lesson learned: just follow the recipe to a T.
I have organized the recipe in such a way that you can follow it per batch / step featuring the ingredients for each step.
Makes 9 Cupcakes
Step 1: Pre-heat oven to 180 degrees Celsius
Step 2: Tsokolate Prep
- 6 Tbsp Ground Tablea Tsokolate
- 2 Tbsp Cocoa Powder (I used Hershey’s Unsweetened Chocolate)
- 120ml Boiling Water
Mix Tablea and Cocoaa Powder in hot water. Let the batter cool and put in fridge.
Step 3: Dairy
- 2 Tbsp Greek Yogurt
- 6 Tbsp Milk (I used Non-Fat)
Mix these two ingredients and set aside.
Step 4: Dry Goods
- 3/4 cup Flour
- 1 tsp Baking Soda
- Pinch of Salt
Sift all dry ingredients and mix together. Set aside.
Step 5: Cream
- 3/4 cup Brown Sugar
- 1/4 cup Butter
- 1 1.2 tsp Vanilla
- 2 Eggs
Cream butter, sugar and vanilla until light and fluffy. Once done, add eggs one at a time without over mixing.
Step 6: Mix all ingredients
- Slowly pour in chocolate mixture into your cream mixture.
- Add in half of your flour mixture and mix.
- Add in half of your dairy/milk mixture and mix.
- Repeat the process for both your flour and dairy mixture.
- Careful not to over mix the batter.
Step 7: Bake
- Divide batter into 9 cupcake moulds.
- Bake for 20-25 minutes.
- Once done, let it cool.
Enjoy! And let me know what you think of the recipe – feedback, suggestions, recommendaitons are welcome!
Easy to Make Dark Chocolate Strawberry Tart
I am an impulsive buyer. As soon as I saw these medium-sized tart bases during one of my bake shop visits, I immediately bought three without thinking twice. I don’t even know how to make a tart or a tart shell!
Easy to Make Healthy Blueberry Lemon Muffin
I love experimenting in the kitchen and researching for quick and easy recipes online. And since I’m always health conscious (does not mean I’m fit! lol), I try to make a healthier version of whatever recipe I have found online.
Tablea Brownies
Following my recent update on my purchase of tablea during my last visit in the Philippines, I have decided the very next day (well, weekend actually) to make a quick and easy chewy tablea brownie.
Easy Salmon Steak & Soba – HappyCall Recipe
Thanks to a friend’s recommendation, I bought myself a lovely Christmas present – a HappyCall. You can check out HappyCall here, some reviews here and recipes all around the internet. I’ve already used and ‘roasted’ a whole chicken in it as well as some stir fry. It’s only this time that I documented a recipe using HappyCall.
Serving Guide When Hosting a Party
I love cooking and being a slave in the kitchen. I especially like ‘hosting’ salo-salo (Filipino term for gathering / party) at home for friends and families. I like to experiment on new recipes and make my ‘staple’ mains.
Honestly, it has always been a hit and miss for me when it comes to food prepared and most especially the amount of fare I make. Always when we I invite friends over, there is a humungous amount of leftovers and most of the time I ask my guests to take food home with them. And sometimes, I just end up throwing the leftovers away as we tend to not eat it when it’s been in the fridge for a couple of days. So when I came across this serving guide on Food Porn‘s Facebook Feed I immediately saved it as it just makes a good guideline for me in the future! Continue reading
Wrapping It For Lunch!
I just started a new job as a Ra Ra Lady (again) and since G and I are really on a tight budget, we decided to bring baon (packed lunch) to work at least twice a week.
I have been contemplating on what to prepare for our packed lunch. Several fast and easy stuff came to mind like sandwiches (G likes his bread white and we only have white at home, but I prefer mine brown for that ‘healthy’ effect), salads, pasta or instant noodles! The idea of a lunch wrap came to me when my colleagues had it a couple of times for lunch and it was good, although it cost about S$12 which is already a three hawker center meals (yes, I’m a cheapskate like that). So, instead of buying wraps, I can make one for me and G and experiment on ingredients to wrap in it! And I came up with these recipes as these are what’s in my kitchen and the easiest one I can think of to make.
 It’s my very own chorizo wrap prepared with love for my G. 🙂
Easy Homemade Chips
To continue my easy-to-cook saga, I now share with you my easy homemade potato chips.
It’s one of those periods when you just want to pigout and stuff yourself with anything and everything. For me, it’s easier to cook than to buy snacks outside because (1) I’m strapped for money as I’m just ‘freelancing’ and (2) I’d like to think I’m a kitchen doctor so I experiment.

What’s for lunch? 🙂 Homemade Potato Chips!


